
Monster Manuals
Brand

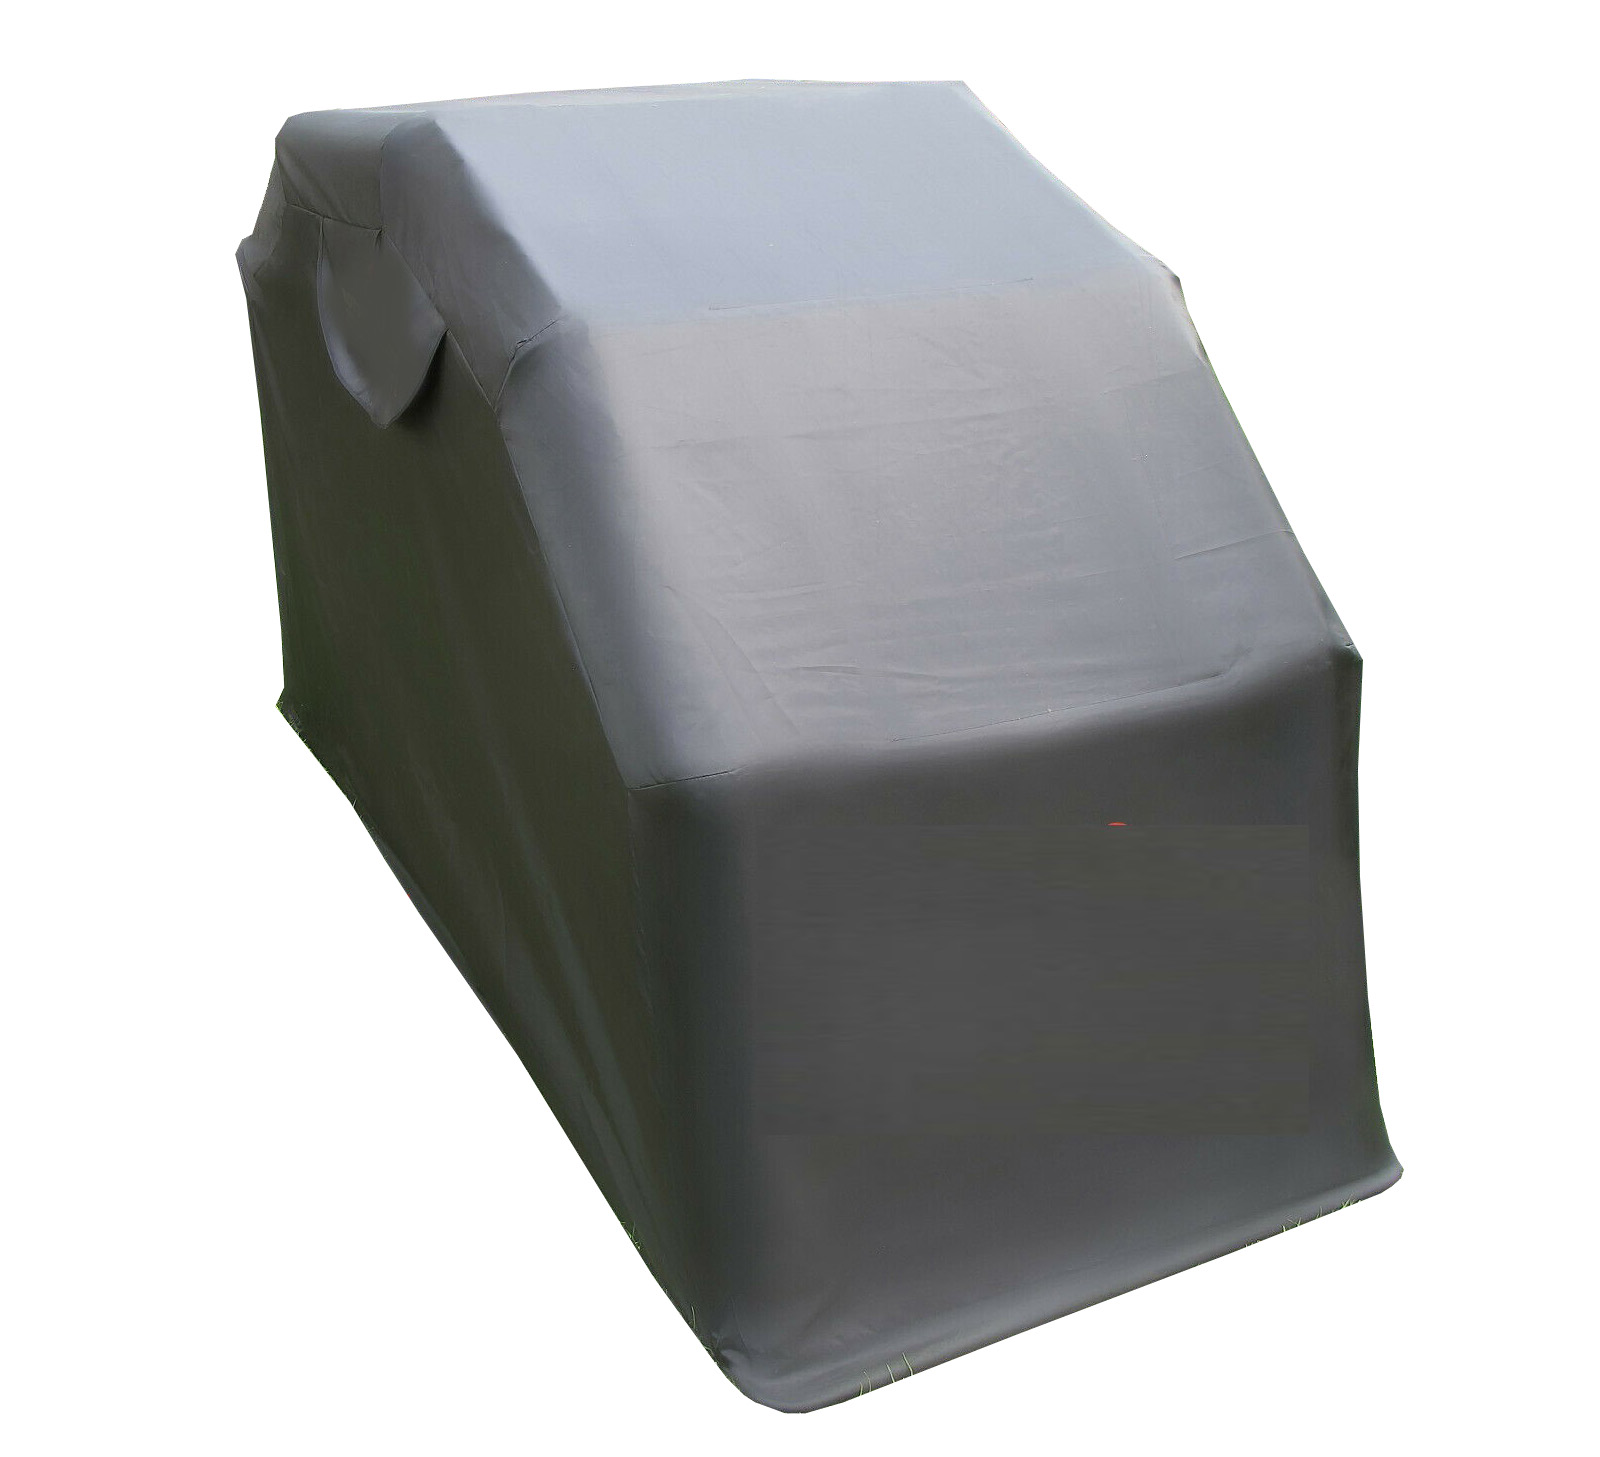
Motorbike Tent
This guide provides step-by-step instructions for assembling components and using your Motorbike Tents.
instructions.monstershop.co.uk
Motorbike Tent
This guide provides step-by-step instructions for assembling components and using your Motorbike Tents.
Product Information
Monster Shop Motorbike Tents provide secure, weather-resistant storage and protection for motorcycles. Featuring a durable waterproof 600D Oxford fabric cover with UV protection, a powder-coated steel frame, ventilation windows, and a lockable access system, it is designed to help protect your motorcycle from outdoor elements. Suitable for outdoor use when correctly assembled, anchored, and maintained.
| SKU | 29593 | 29594 | 218114 | 218115 | 218116 | 218117 |
|---|---|---|---|---|---|---|
| Length | 270cm | 294cm | 270cm | 294cm | 345cm | 345cm |
| Width | 106cm | 104cm | 106cm | 104cm | 188cm | 188cm |
| Height | 155cm | 170cm | 155cm | 170cm | 190cm | 190cm |
| Material | Oxford fabric, Black powder coated steel | |||||
| Net Weight | 17kg | 18kg | 17kg | 18kg | 26kg | 24kg |
| Gross Weight | 19kg | 20kg | 19kg | 20kg | 28kg | 27kg |
Motorbike Tent
EN
Safety Information
Safety Advice
Ensure you have read and fully understood the instruction manual and safety advice before using this product.
• This product is intended solely as a protective storage shelter for motorcycles of a suitable size and must not be used for any other purpose.
• Assembly must be carried out by a competent adult familiar with basic assembly procedures.
• Check that all components are present and undamaged before assembly. Do not assemble or use the product if any parts are missing, damaged, or defective.
• Assemble the product only on a stable, level surface capable of supporting the shelter and the motorcycle being stored.
• Keep the assembly area clear of children, pets, and bystanders during installation.
• Take care when handling steel frame components to avoid cuts, abrasions, or impact injuries.
• Wear suitable protective gloves during assembly, adjustment, maintenance, and inspection of the frame and anchoring components.
• Follow the assembly instructions carefully and ensure all fixings, connectors, and frame components are securely tightened before use.
• Use appropriate lifting techniques when handling the frame or cover and seek assistance when moving large or heavy components.
• Avoid overreaching, twisting, or lifting beyond your physical capability during assembly and installation.
• Always secure the shelter using the supplied anchorage system before use and ensure all anchorage points are fully installed and firmly secured, as failure to properly anchor the shelter may result in movement, instability, property damage, or personal injury.
• Install the shelter with adequate clearance from walls, fences, vehicles, walkways, and other obstacles.
• Keep the surrounding area free from clutter, tools, cables, and other trip hazards.
• Exercise caution when walking around the shelter, particularly in low-light conditions.
• Ensure the cover is correctly fitted and secured to prevent loose material creating a trip hazard or becoming damaged by wind.
• Keep hands, fingers, hair, jewellery, and loose clothing clear of moving frame sections when opening, closing, or locking the shelter.
• Open and close the shelter slowly and in a controlled manner to reduce the risk of finger trapping or impact injuries.
• Use designated handles, grips, or intended operating points when opening or closing the shelter.
• Never force the mechanism if resistance is encountered. Inspect the shelter for obstructions or damage before proceeding.
• Ensure the locking mechanism is fully engaged when the shelter is closed.
• Keep padlock keys in a safe location and out of reach of children.
• Children must not play with, operate, climb on, swing from, or hang from the shelter.
• This product is not a toy and must only be operated by responsible persons capable of doing so safely.
• Do not allow anyone to sit, stand, climb, or place excessive weight on any part of the shelter structure.
• The shelter is designed to protect a motorcycle and is not intended for human occupancy.
• Do not use the shelter as a workshop, living space, temporary accommodation, or recreational structure.
• Always fully open the shelter before moving a motorcycle into or out of the enclosure.
• Ensure adequate visibility around the shelter before manoeuvring a motorcycle.
• Check that the surrounding area is clear of people, animals, and obstacles before moving the motorcycle.
• Maintain clear access routes around the shelter at all times.
• Use caution when manoeuvring motorcycles near the frame to avoid collision damage or personal injury.
• Regularly inspect the cover, frame, anchorage points, locking system, and fixings for signs of wear, damage, corrosion, loosening, or deterioration.
• Replace damaged, worn, or defective components immediately and discontinue use until repairs are completed.
• Do not modify, drill, weld, cut, alter, or add attachments to the shelter as this may compromise safety and structural integrity.
• Make use of the mesh ventilation windows to promote airflow and reduce moisture accumulation.
• Ensure ventilation openings remain unobstructed during use.
• Moisture and condensation may accumulate within the enclosure and create slippery conditions on the motorcycle, floor surface, or surrounding area.
• Inspect for condensation regularly and dry affected surfaces before handling or riding the motorcycle.
• Where possible, allow wet motorcycles to dry before extended storage within the shelter.
• Exercise caution when entering or accessing the shelter during wet weather conditions.
• Although the cover provides UV protection, prolonged exposure to severe environmental conditions may result in gradual material degradation.
• Close and secure the shelter when not in use.
• Keep all ignition sources, naked flames, sparks, barbecues, heaters, and other heat-producing equipment away from the shelter.
• Do not use open flames or carry out hot work operations within or immediately adjacent to the shelter.
• Do not store flammable materials within the shelter
• Exercise care when accessing the shelter in darkness and use adequate lighting where necessary.
• Discontinue use if any sharp edges, structural damage, or significant corrosion are identified until appropriate repairs or replacement parts are obtained.
• Store spare keys securely and ensure authorised users understand the safe operation of the locking mechanism.
• Keep packaging materials away from children and dispose of them responsibly, as plastic bags and packaging materials may present suffocation or other hazards.
• If the product reaches the end of its service life, dismantle it carefully and dispose of metal, fabric, plastic, and packaging materials in accordance with local waste disposal and recycling regulations.
• Retain these instructions for future reference.
Monster Group UK Limited’s liability will be limited to the commercial value of the product only.
Please visit https://monstershop.co.uk/policies/terms-of-service to see the full terms and conditions.
GPSR Information
UK GPSR Information
Manufacturer
Monster Group UK Limited
Monster House 19-23 Alan Farnaby Way
Industrial Estate Sheriff Hutton
York YO60 6PG
England
+441347878880
Monster House 19-23 Alan Farnaby Way
Industrial Estate Sheriff Hutton
York YO60 6PG
England
+441347878880
Representative
Rana Harvey
Monster House 19-23 Alan Farnaby Way
Industrial Estate Sheriff Hutton
York YO60 6PG
England
+441347878880
Monster House 19-23 Alan Farnaby Way
Industrial Estate Sheriff Hutton
York YO60 6PG
England
+441347878880
EU GPSR Information
Manufacturer
Monster Group BV
Van Heemskerckweg 28A & B
-
Venlo 5928LL
Netherlands
+441347878880
Van Heemskerckweg 28A & B
-
Venlo 5928LL
Netherlands
+441347878880
Representative
Rana Harvey
Van Heemskerckweg 28A & B
-
Venlo 5928LL
Netherlands
+441347878880
Van Heemskerckweg 28A & B
-
Venlo 5928LL
Netherlands
+441347878880
Included Parts
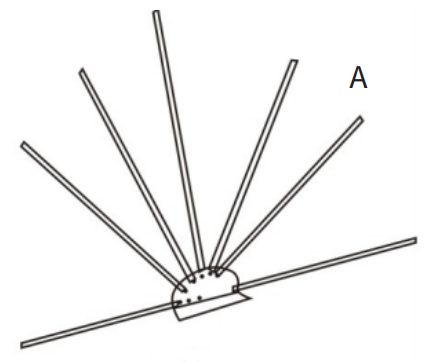
1x
Part A
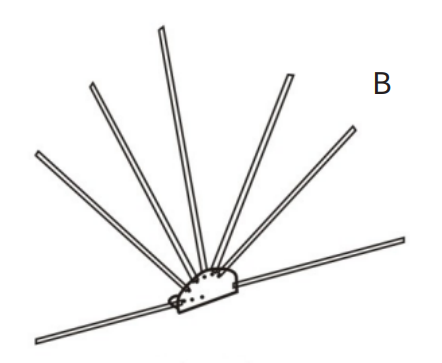
1x
Part B
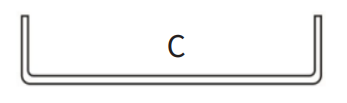
7x
Part C

1x
Part D

2x
Part E

8x
Part F
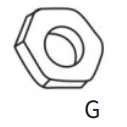
8x
Part G
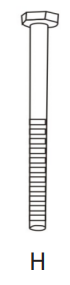
8x
Part H - M5 x 30mm bolt
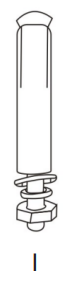
6x
Part I - M5 × 80mm bolt
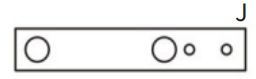
2x
Part J

2x
Part K

2x
Part L

1x
Part M
Monster Manual
Assembly
1. Step 1
- Place Part A and Part B on the ground, parallel to each other as shown. Ensure you are facing the shortest metal rod, which is the rear side of the tent.
- Attach the 2 x E metal rods on the rear side of the tent using the screws, nuts and washers provided (F, G, H).
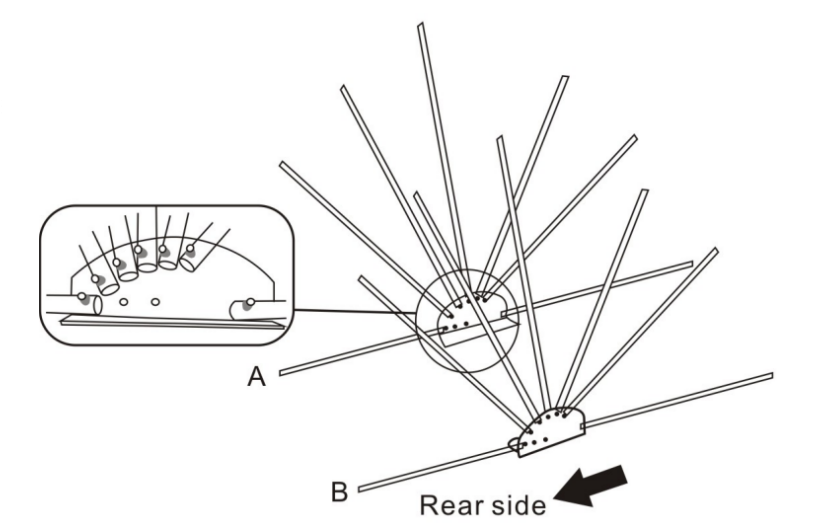
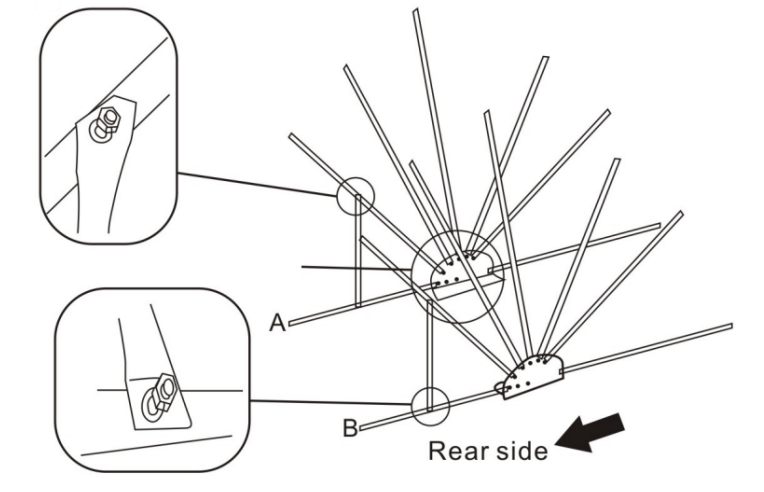
2. Step 2
- Connect Part A and Part B using the 5 x C metal bars as shown. Connect those on top of the metal rods from A to B, leaving the base and front disconnected. The frame should now stand by itself.
- Attach Part D to the rear side of the frame, as shown.
- Take the 2 x Part J and use the screws, nuts and washers (F, G, H) to fix these onto the A and B bases, as shown.
- Slide the K steel hoop through the longest bottom rod on the front side of the frame. Do this on both the A and B sides of the frame. Make sure to NOT SLIDE the K steel hoops through the Parts J that you previously installed.
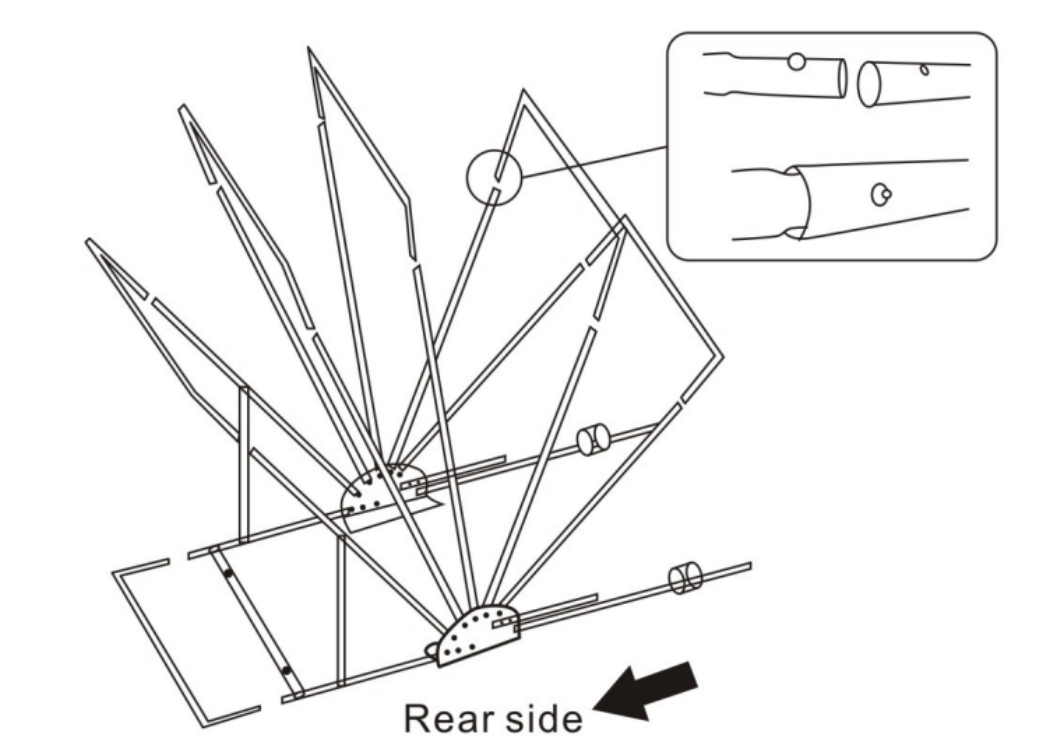
3. Step 3
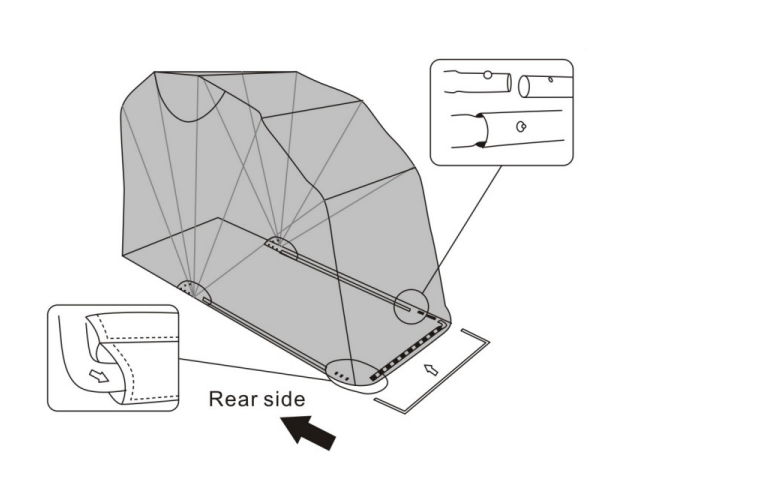
- Fold the frame backwards (towards the rear side), and spread the fabric cover (Part M) on the frame. Ensure the cover is correctly positioned over the rear and front sides. Slide the front rods (the longest base rods) through the fabric sleeves.
- Pass one of the C metal bars through the front fabric sleeve. Once this is done you can connect it to the base rods of A and B to complete the front side of the frame.
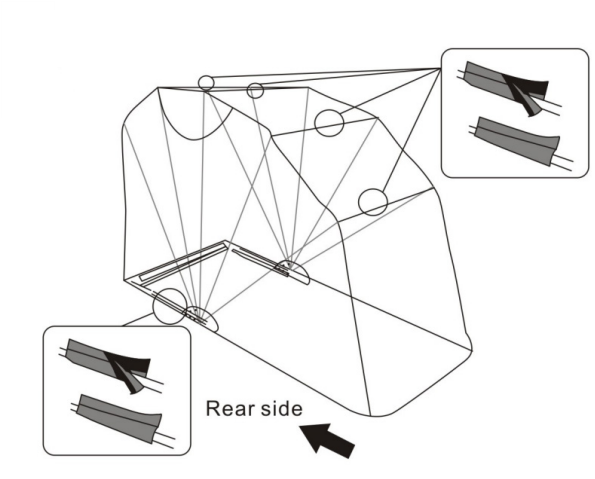
- To finish the tent, simply wrap the rods with the hook and loop, including the rods on the rear side of the base.
- To lock the tent, make sure to slide the K steel hoops through the rod and Part J. This will not allow the cover to fold anymore. For extra safety, you can use a padlock.
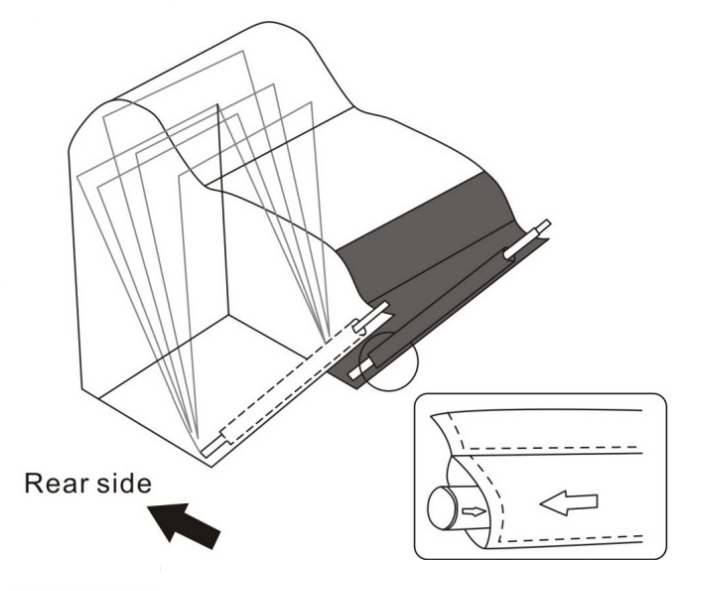
Maintenance
• Inspect the shelter regularly and after periods of adverse weather.
• Remove accumulated snow, standing water, leaves, or debris from the cover as soon as it is safe to do so.
• Check all frame components, fixings, and connections for signs of loosening, wear, damage, or corrosion.
• Inspect all anchorage points to ensure they remain secure and firmly fixed in place.
• Examine the fabric cover regularly for tears, punctures, abrasion, UV degradation, or other damage.
• Check the locking mechanism, padlocks, and keys for correct operation and signs of wear.
• Inspect mesh ventilation windows and Velcro fasteners to ensure they remain clean, secure, and functional.
• Remove dirt, leaves, standing water, snow, and other debris from the cover promptly to prevent unnecessary loading and material deterioration.
• Clean the fabric cover using only mild soap and water.
• Do not use abrasive cleaners, solvents, bleach, or harsh chemicals, as these may damage the cover material and protective coatings.
• Allow the cover to dry completely before prolonged closure or storage to minimise mould, mildew, and condensation build-up.
• Regularly inspect the shelter interior for excess moisture or condensation and dry affected surfaces as required.
• Lubricate moving metal parts and locking mechanisms periodically using a suitable light lubricant.
• Inspect all exposed metal surfaces for corrosion and treat or replace affected components where necessary.
• Check for sharp edges, bent frame sections, or structural damage and discontinue use until repairs have been completed.
• Tighten any loose fixings immediately using the appropriate tools.
• Replace damaged, worn, or defective parts immediately and do not use the shelter until it has been fully repaired.
• Store spare keys in a secure location and ensure replacement keys are available if required.
• When the shelter is not required for extended periods, clean and dry all components thoroughly before storage.
• Retain these instructions for future reference and ongoing maintenance.
Troubleshooting
Please read through the guide below if you have any issues or faults with your device. The information covers and resolves the majority of frequently asked questions.
Q: There are parts missing from my order.
A: If there appears to be any part missing from your package contact our Customer Support team via the details on the Contact Us page within 7 days of receipt.
For all other issues please contact our Customer Support department via the details on the Contact page.